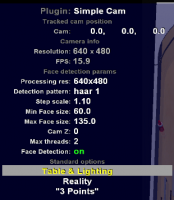
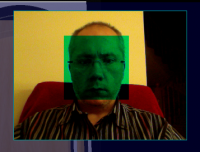
You can use any webcam to track player's head position in real time. Players head is traced only in 2D. You can move "virtual cam" in X & Y axis. Cam Z value is fixed. On default it is above cab/display border closest to player.
Face detection is cpu power hungry. If You have 2 (or more) cores in Your machine it will not do big harm to FP frame rate.
Installation
This plugin is added to BAM as default. Merely, attach your webcam to your computer. You can place camera on top of , or in front of Back box.
Setup
You have to make sure that Face Detection works. The green square should be displayed consistently on your face . If you have a problem with face detection first try to tweak cam params.For starters you can try:
- Run the program for your CAM from producer and try to:
- Disable automatic gain & exposure regulation
- Set it manually to make face clearly visible
Automatic regulation almost always has "gain"set too high and face on cam is like a big bright spot.
- Run BAM and test face recognition. If you don't see green box on "face" with default setting try again to set CAM params from previous point.
Set values in plugin menu:
- Detection pattern - LBP is fastest, but make more "jittering", I use "Haar 1".
- Min Face Size - green square displayed on "cam view" have width/height. You can set minimal accepted size. Try to increase value. If you increase this value too much, then "green" box will disappear. Then reduce value little bit. By doing this you will prevent detection of objects "smaller" than your face that may be interpreted as a "false face". It will increase performance too.
- Max Face Size - is maximal accepted size.
- Step Scale - lower value will incease detection accuracy but reduce performance.
Other Menu options:
- Cam Z - You can move virtual camera position in Z axis.
- Max threads - face detection can start multiple threads. More thread will increase CPU usage and number of processed frames from camera, but reduce whole game performance. Default value (2) is probably best.
- Face Detection - switch to enable / disable FD algorythm.
3 points
Once you have accomplished "good" tracking, go to "3 points" menu. BAM needs to know distance between left and right edge of your table, and how high they are in cam. You do this by showing BAM the first 2 points in "3 points" setup.
You can "put" face on points, but it is inconvenient. (But it can be done). I use an object (plastic tube) with known height and set these points at known distances (only verticaly) from screen. This distance is measured to "eye" level. Put one end of "plastic tube" on "red diamond" displayed on screen. Put the other end at your face/"eye". Then press "set point" (face detection is required). Do likewise for setting the second point.
BAM will ask for third point. This point is used only to trace in 3D. With "Simple Cam" it is unused. You shoud set "any" point. This point is not used in calculations.
About "distance" betwen screen and eye.
This is distance between "red diamond" displayed on screen and "eye" in the moment when You press "Set point".
When you finish "3 point" setup BAM recognizes the points as "level 0" (or CAM Y=0). Now you need to tell BAM, that "level 0" is lower. To do this You should set this distance with "Shift Y"under "Reality" Submenu
(Please remember to set size of your TV screen, because this value is used to translate values in CM or INCHes to Future Pinball Unit).
Example
This mode is simplest way to test head tracking. You do not need any equipment except webcam. You can see how this works in the following movies:
by The Loafer
by open6l
This plugin is very similar to "Simple Cam". Only difference is the ability to change PS3Eye: Gain, Exposure and number of captured frames per sec (FPS).
Installation
- Uninstall EyeToy drivers.
- Download & install (with "developer" libs):
CL-Eye-Platform-SDK. - Install EyeToy drivers (same ones that you removed in step 1):
CL-Eye-Driver.
Kinect is GREAT. It can trace You in 3D without any other tools! So here is Kinect Head Tracking for BAM!!!
***if you purchased kinect with xbox360 console you may need to purchase the usb/power adapter that will connect it to your PC. It can be ordered online through Amazon/Ebay. I believe this adapter comes automatically when kinect is purchased separately from console.
Plugin created by Andreas Benamou
email: This email address is being protected from spambots. You need JavaScript enabled to view it.
Installation
- Download and install Kinect SDK
http://download.microsoft.com/download/3/1/3/313117D2-315D-4450-86F7-0A761DA19F57/KinectSDK-v1.7-Setup.exe - Connect Kinect to PC. (allow system to install drivers. You can test/experiment with Kinect for pc with Kinect explorer demo program that come with the KinectSDK)
-
Run BAM and select plugin: Kinect
Menu
(**Note the following description applies to older versions of BAM which have since been updated to include automatic point detection as well as "skeleton" mode. Skeletal mode performs skeletal tracking as opposed to head tracking. Skeletal tracking is very useful when player glasses and especially 3d glasses (when used in combination with active 3d mode) obstruct the Kinect IR signal. Discussed under Bam Corner at Gopinball.com)
Only two options:
- Angle - You can use Kinect motor to tilt camera
- Eye - Kinect face detection can find eyes on face. You can chose left or right eye to be tracked.
"3 Points"
Befor BAM will track your head You have do "3 Points" setup. You have 3 ways to do it:
- Easy "3 points" low - on screen is drawn in checkerboard. Kinect camera is rotated down. If checkerboard drawn on screen is recognized, then "3 points" setup is done.
- Easy "3 points" high - same as "low", but checkerboard is drawn by a little different way.
- "3 points" - old version. Use it if none of "Easy" option works.
If You put Kinect "low", almost at screen, You should use "low" version. (recomended).
If You put Kinect "high" for example on top of backbox - use "high" version.
How to do old "3 Points" setup:
- Select "3 Points".
- Grab some object with know size (You can use book, anything).
- Put "object" on red diamond (left/bottom of screen).
- Put your head over it. (your chin should touch the "object").
- Make sure, that Kinect recognizes your face. (You will see yellow "mask").
- Press enter (set point).
- Repeat 3-6 with second point (right/bottom).
- Repeat 3-6 with third point. But... you don't have to put "object" exactly on red diamond. Just as far as possible from bottom screen line, when Your face is detected.
- Tracking will now work, but BAM will get Your position "too low".
- Enter "object" height in "shift-y" in "reality" menu. Add few more inches/cm (2-5in./5-12cm).
Position is tracked to "center" of Your head. When you press Enter in "3 Points", tracked point You set is: ["object" height] + [distance from chick to center of head] above "red diamond". - Test. Look at red diamond when BAM menu is visible. If your head is above screen, red diamond shoud be directly under head.
- Smoothening. Cam position is not updated very often. Go to: "Reality" menu and set "Latency" to ~60-100ms.
(If You want to make nice move, increase it to 200ms and move camera realy slowly).
After "3 Points" setup, you can change "tilt" angle. If you move Kinect, You have to repeat "3 Points".
Where to put Kinect
- best place is low, before the Backbox. This way you will be able to look down at table almost vertically. But there is one problem. Kinect for XBOX 360 can trace objects 0.8m away from camera. It will be hard to set third point in "3 Points". Kinect for Windows can trace 0.4m away from camera.
- top of backbox. It will be "easier" to set third point, but Kinect will probably lose tracking, when you look down.
- if you use Easy "3 Points", Kinect depth range limit is not a problem (only color camera is used), so try to put kinect "low".
- Kinect camera must see "checkerboard" on screen. If it fails in Easy "3 points" low, try to put Kinect 1-2 inches (2-5cm) higher on book or small box.
Tip: DO NOT RUN BAM-TRACKER.EXE WHEN YOU WANT TO PLAY FUTURE PINBALL.
(or you will get message "Kinect not found")
To use Kinect 2 with BAM you will need.
Hardware:
- Kinect 2 (Kinect for XBOX One)
- Kinect Adapter for Windows: Microsoft store
- Windows 8 or newer
- USB 3.0 port. (Warning: some USB 3.0 controlers are not supported by Kinect).
Software:
- KinectRuntime: https://download.microsoft.com/download/A/7/4/A74239EB-22C2-45A1-996C-2F8E564B28ED/KinectRuntime-v2.0_1409-Setup.exe
Where Kinect should stand?
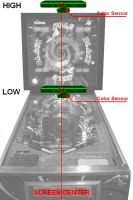
You will see what is visible to Kinect in BAM. Kinect must see 2 things: player and part of payfield screen. If Kinect is placed "high" (at top of backbox) it must see ~ 40% of screen. It is same space where BAM menu is displayed. If Kinect is placed "low", it must see ~80% of screen.
Calibration
Before Kinect 2 will be able to trace you, it must find where is playfield display. To do this, you need to run calibration command from Kinect 2 menu. BAM will display checkerboard patern on screen. If Kinect successfully detect that pattern, you will see message on screen and all will work. If you move Kinect to other place or rotate it, you will have to repeat calibration.
Kinect v2 uses skeleton tracking. It detect head position, not eyes. So you have 3 more params to adjust where is "eye". Default values works fine for me. You may change it for example when you try to make video with phone camera.
Tip: DO NOT RUN BAM-TRACKER.EXE WHEN YOU WANT TO PLAY FUTURE PINBALL.
(or you will get message "Kinect not found")
This is similar plugin to WiiMote Cam.
Installation
- Uninstall EyeToy drivers.
- Download & install (with "developer" libs):
CL-Eye-Platform-SDK. - Install EyeToy drivers (same as removed in step 1):
CL-Eye-Driver.
Setup - dots detection
This is "a dot" or "how PS3Eye see IR-LED":
Now look at one line of pixels:
In the menu, you can set:
- Min. brightnes - all points in picture from cam with brightnes below this level will be will be considered black (brightnes = 0). This value is used mostly to eliminate "noise" and separate dots from background. If you set Min. brightnes value to 0 and set gain & exposure like "Simple PS3Eye", you will see in "cam view" normal, picture from cams (well... almost).
- Req. brightnes - every dot has one pixel with maximum brightnes, this value is used to eliminate "dots" to dark. I usly don't use this value.
- Min. dot weight - for every "dot" is calculated "weight". It is the sum of brightnes of all pixels in dot. This value is used to eliminate "noise" from cams.
How to set it up:
- gain - this is the typical param of camera. If you increase this value, it will increase brightnes of all pixels... but at the same time it will increase amount of "noise". It is like the digital zoom in a photo camera. It will allow you see better but will not increase quality of information for BAM. You should set this to zero for dot detection.
- exposure - this is the time it takes for the camera sensor to gather light. This is the best way to increase brightness of "dots" because if you increase it, you will not increase "noise". I set it to: 200-300.
- Min. brightnes - level of "noise" in camera picture, when i set gain=0 is ~30. You should initially set this value to ~20 (small amount of "noise" is not a problem for BAM). If you see "room" in cam view, you can increase this value. It will be no problem to set Min. brightnes=100. When you increase Min. brightnes, you will probably have to increase exposure.
- Req. brightnes - now it is not very useful. I usually set it low (=100). If You have object visible in cam view but this object "maximum brightnes" is lower than brightest of IR-LED You can increase this value to eliminate detection of this "spot" as IR-LED. Be carefull with this. If you move IR-LED to this bright spot, then around the IR-LED will not be a black border, BAM can detect pixels of LED and this spot as one big "dot".
- Min. dot weight - i set this to 200-300. It can eliminate realy small false "dots" from background.
To get best "subpixel" accuracy BAM should get "dots" with high brightness. In the menu, there are few more options:
- FPS - how many frames per second will be taken from cams. I set this to 60, but you can test some other setting.
- Resolution - with 640x480 dot detection is more accurate, but FPS is limited to 75. Only in very rare situations you will see difference betwen 640x480 and 320x240. You can change this in any time. When you change it no calibration is required. Higher resolution requires more CPU power. Notice: When BAM draws picture from cams in menu, a lot of CPU time is used to manipulate pictures. This "CPU power" is used only when BAM menu is visible. "normal" game pixel detection doesn't consume a lot of CPU time.
In menu there is option OSD. You can select what additional information will be displayed at "cam view". If you select "histogram" on top of cam view, a red line will be drawn. It represents number of pixels with specific brightes on picture. On right are pixels with lower values (starts from 1). It can help to set right "dots detection".
Calibration
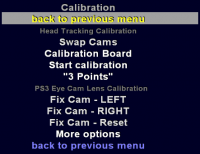
This is submenu is to calibrate cams for head tracking. Most of the options are similar to "WiiMote cams":
- Swap Cams
- Calibration Board
- Start calibration
- "3 Points"
I will not describe here how to use this (same procedure as "WiiMote cams"), but here are a few tips:
- During calibration don't try to "cover" whole visible space for cams.
- Start at "center" for both cams.
- Try to not rotate board.
- Keep calibration board in radius ~20 cm from start position.
- First 5-10 frames are most important. Try at begin have one fram at center, and 4 frames at square corners at same distance from cams.
Problem with camera lenses: greater FOV gives greater distortions of picture.
To make cams usable for "head tracking" BAM has to correct pictures taken from PS3Eye camera and make the straight lines, straight again. To accomplish this, use the following menu commands:
- Fix Cam - LEFT
- Fix Cam - RIGHT
When You select this command, BAM will take 40 frames (with 4 dots of calibration board), and use this data to correct distortions. Process is very similar to "calibration of 2 cams", but You should "cover" whole visible space (in same distance from camera). You do it for one cam at time. Then BAM collects 40 frames and will calculate "fix" for cams. Calculation will take 1-2 minutes (2x-4x longer than calibration for 2 cams).
You can set OSD to grid. BAM will display grid on image. It will give You better view how corrected picture from cam looks for BAM. It will probably look like this:
Sometimes calibration goes wrong, and You will see really weird things in cam view.
You should repeat "Fix cam lense" calibration (and make sure, that you set correct values in calibration board).
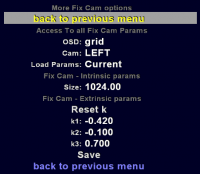
Fix Cam
If you select more options in calibration menu, then you have access to Fix Cam params. In this menu:
- osd - select additional info displayed over Cam View
- cam - selet on which cam you work (Left / Right)
- Load params - every time you change this option, plugin will load "fix cam" param to menu:
- current - setting of Fix Cam you use now
- Last modified - If you manually modify values and change again "Load" for example to "current", before loading of params, change values are stored in "Last modified"
- Second Cam - If you want copy values from one cam to another, you can use this option
- Last Saved - Every time you "save" setting (last option in this menu) values are: 1. set as fix cam for selected Cam. 2. Save to disk.
- ravarcade 3.6mm - my settings. Plugin have built-in default params used to fix distortions. - k1, k2, k3 - are values from "polynomial" and describe lens curve.
- size - this value limits range of used "polynomial"
- Save - set values for lens and save it to file: HT-PS3Eyes-FixCamExport.dat
If you try to manipulete these values, you will see "real time" effects on cam view. When you change values remember to "save" it. If you leave menu without saving, there will be no changes in "fix cam". After you save "fix cam" params, you have to do normal "stereo calibration". (If you don't, these new values will not be used. You will only see how they look in cam view).
If you use modified manualy "fix cam" params plugin will set "Fix Cam Quality" to 1.0. Don't worry about this value. It is only valid if You use own "Fix Cam".
You can share "HT-PS3Eyes-FixCamExport.data" file. From this file "FixCam" params can be loaded by others. (or entered manually).
Why I have created these options?
- It is really hard to do good "Fix Cam".
- Fix Cam created for one cam, usually works very well with the other. For example my values created with replaced lenses work quite well with original PS3Eye lenses. It is strange, it should not work, but it does.
- This is fortunate , and if you do only normal stereo calibration (without making own "Fix Cam") head tracking will work very well.
- Try to do test like me on video: https://www.youtube.com/watch?v=C4tknTMgLXo
NOTICE:
- Data calculated during "Fix cam" is valid as long as you don't change lenses (or change focus).
- If you move cams, only normal calibration for 2 cams is required.
- Under cam view BAM displays Camera Fix Quality. It should be lower than 0.5. I sometimes get it lower than 0.1. Very small values don't guarantee better results, but big values mean: calibration fails.
- After "Fix cam," you can increase gain and exposure and set Min. brightnes to 0. This way you will see in cam view normal image of your room. You can check if the string lines are realy straight. (Use some long object with straight edges).
- You will get better results of "Fix cam" and "Calibration (for 2 cams)" if dot detection has better accuracy. You can set resolution to "640x480" only for calibration.
 visual_manual.pdf, Fix Cam - How to
Free Track protocol is used by a few different tracking devices. Now BAM supports it. This protocol has one important flaw. Every time you start tracking, a new coord system is set. It means, that when you start tracking program second time point (0,0,0) reported with this protocol may be in a different place than after first start of tracking program. So for example, after restart of computer BAM calibration previously done in "3 point" setup is no longer valid.
To avoid repetition of calibration BAM uses a different approach to setup.
Here is an example how to set it up with FaceTrackNoIR and FaceAPI.
1. Setup of FaceTrackNoIR.
- Go to this site, download program and install it: http://sourceforge.net/projects/facetracknoir/
- Select Tracker Source : FaceAPI;
- Click "Curves" (left/bottom), switch tab to "Translations" and press Reset buttons for all 3 axis. It is required, because FaceAPI returns coords in cm and BAM don't need to scale it.
- Select Game protocol to "FreeTrack 2.0";
- Press Start and test how it works;
- Look at "Shortcut keys", here are 2 important keys: Center (default set to "Home" key) and Start/Stop (default set to END key). During setup in BAM, you will have to use "Center" key.
NOTICE. You will have to start tracking before you start BAM/FP.
[optional] You can disable cam move filtering in BAM and use filtering in this program.
- In BAM menu go to [Config] - [Player Tracking] and under Cam move smoothing set modeto "none";
- In FaceTrackNoIR: In Global Setting select Smoothing samples number: from 1 to 4;
- In FaceTrackNoIR: Select Filter: Accela filter mk2. You can modify filter settings;
2. Start BAM/FP and configure [Reality] menu.
- Set display size;
- Select units: inch or cm;
- Select mode: Cab or Desktop;
- Set Cab dimmensions or display angle in Desktop mode (angle =0 is good easy choice).
3. Select Free Track plugins.
- Set base camera position. You will have to put your head exactly in this place and press "Center" key for FaceTrackNoIR. Easy way for Cab is to set "X=0, Z=0, and Y=know distance above CAM edge" of cab. For desktop do somthing similiary: X=0, Z=known distance from display, Y=half of display height if you sit exactly at front of display;
- If you don't forget to start tracking in FaceTrackNoIR, put your have on "base cam position" and press "Center" key;
Tracking should work now.
4. Set filtering in BAM.
Go to [Config]->[Player Tracking] and try to find right filtering
NOTICE.
I tested this method with my "apple in-sight" cam in my notebook and with unmodded PS3Eye cam on my "pseudo" cab. Results are very close to Kinect. Please note, that different cams have different FOV. My PS3Eye cam works perfect in "narrow" lens setting. With "wide" lens setting my move in real world was ~20% bigger in game. To eliminate this, you can change "curves" for translations in FaceTrackNoIR.
5. In Free Track plugin, you can set rotation of tracked axis.
For example in my "cab" test, I put camera few inches below my head level and camera "looks" a little UP. To compensate it, I set X axis rotation to: -10 deg.
This was an example of Free Track for FaceAPI (face detection). You can use this plugin to trace IR leds same way as any Free Track game.
Also there is a way to use Augment Reality (AR) marker (see open track project: https://github.com/opentrack/opentrack ).
Because Free Track works really well, old Simple Cam/PS3Eye, Desktop Cam/PS3Eyeplugins are no longer in Plugins directory of recent Bam releases. They still work.
I did not test OpenTrack. But it can trace AR marker. It may work better than face detection.
------------------------------------
CONGRATULATIONS. You are almost at end of this looong post
------------------------------------
Please rememeber, FaceTrackNoIR and OpenTrack are really good useful projects. They have their own authors. You can find "donate" buttons on these two sites:
http://sourceforge.net/projects/facetracknoir/
https://github.com/opentrack/opentrack/
Why?
Future Pinball can communicate with TrackIR only with this settings. BAM don't send or receive anything from TrackIR. Only overhears what TrackIR send to Future Pinball.
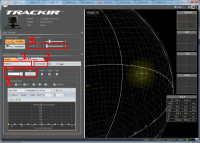
TrackIR Settings
- Set profile to "One:One"
- Set checkbox "Exclusice"
- Set Action Key "Center" to key You like to use
- Disable Smooth
Why?
Default settings aren't "linear". It means, that if you move head 1 inch, sometimes TrackIR report 1/4" move and another time 3/2". If you set smooth to 0, you will reduce input lag. TrackIR have very good resolution.
BAM Settings
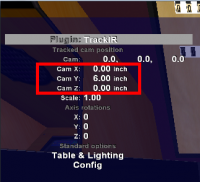
Select TrackIR plugin in BAM and enter "base head position" (as CamX, CamY, CamZ). You will have to put head at this position every time, you will press "Center" key (see TrackIR Settings, point 3). When you press this "center" key, TrackIR will interprete this position as "base position" and report player position as diference, between this "base position" and current. Ok ... it sounds complicated ... don't panic ... now easy version:
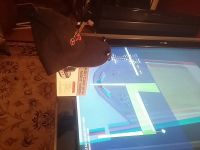
As default BAM set this position to 6 inches above edge of display close to player. Only "TrackIR Reflector Clip" must be at this point. So do it this way:
- Get small box and put it on edge of display. (This may also be the head of the dummy).
- Put hat with reflector clip over this box. (see image on right).
- Press "Center" key.
- Now play (with reflector clip on your head).
This last procedure You will have to repeat every time, you start Future Pinball with new table.
You also may change scale or rotation of axis, but default values (Scale = 1.0, all rotations = 0.0 deg) should work fine.
You may also enter different "base position". For example on your head (like this: CamY = 32 inch, CamZ = 3 inch). After "centering" of base position You may pass hat with reflector clip to other player (with different height). You don't have to repeat "centering".
Limitations
- TrackIR with BAM works only with Future Pinball. It will not work with BAM-Tracker.
- Every time, after "centering", TrackIR will set axis little different. If you stay in exacly same place 10 times, for BAM it will be 10 different places. Error is small and don't break "feel of depth"... but if you look carefully you will see. For me it is main pitfall of TrackIR compared to IR-Led tracking (HT w/PS3 Eyes) or Kinect.
- TrackIR require BAM v.1.2-84 or newer.
- It work only with BAM - Forced Arcade Mode. Switch is BAM [Addons] menu.
TrackIR has very small CPU usage, realy great accuracy, minimal lag (like my IR-LED tracking) and is easy to use. I put it on second place in list of best tracking solution for BAM.

